
티스토리 뷰
앞선 글에서 PyTorch Hub를 맛보고자 Load tacotron2+waveglow from PyTorch Hub 를 진행해봤습니다. 이번 글에서는 PyTorch Hub가 어떤 원리로 어떻게 사용되는 것인지 살펴보려고 합니다. 모든 내용을 살펴본 이후에는 우리의 커스텀 모델을 등록하는 것으로 글을 마무리 합니다.
torch.hub.load()
자, 이전에 작성했던 코드에서부터 출발 해볼까요?
# contents of waveglow.py
import torch
waveglow = torch.hub.load('nvidia/DeepLearningExamples', 'nvidia_waveglow')
torch를 import하고 torch.hub.load() 함수를 통해 미리 학습된 모델을 불러왔습니다. 이전 편에서는 언급하지 않았지만 PyTorch Hub는 release 기준으로 torch 1.1.0 버전부터 사용 가능 합니다. 자, 여기서 load()는 다음과 같이 공식 문서에 정의되어 있습니다.
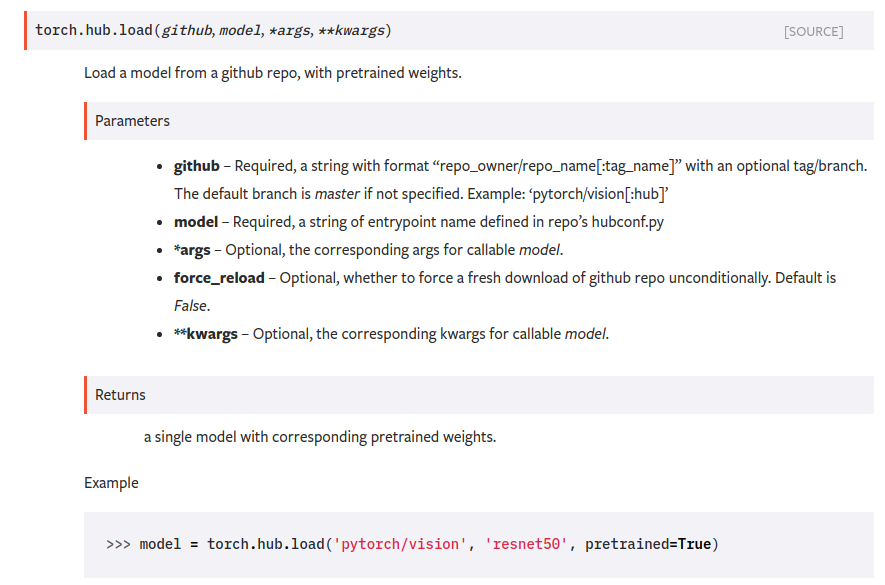
첫 번째 인자로 github의 주소가 repo_owner/repo_name[:tag_name] 형식으로 들어갑니다. 지금 우리가 테스트 했던 waveglow의 경우에는 Nvidia GitHub에 등록되어 있는데요. 전체 주소는 아래와 같습니다. : https://github.com/nvidia/DeepLearningExamples
github.com을 prefix로 생각한다면 정확하게 repo_owner/repo_name을 torch.hub.load()의 첫 번째 인자로 넘겨줬다는 사실을 확인 할 수 있습니다.
두 번째 인자로 넘겨줬던 nvidia_waveglow 는 해당 레포지토리에 등록되어 있는 모델입니다. 잠깐, 등록되어 있다고요? 네 맞습니다. 모델(함수, 클래스 등)을 torch.hub.load() 의 첫번째로 넘겨받은 레포지토리에 있는 hubconf.py에 등록해놓고 사용하는 구조입니다. nvidia에서 제공하는 hubconf.py는 대략 아래와 같은 형상으로 구성되어 있습니다.
# contents of hubconf.py
def nvidia_waveglow(pretrained=True, **kwargs):
    """Constructs a WaveGlow model (nn.module with additional infer(input) method).
    For detailed information on model input and output, training recipies, inference and performance
    visit: github.com/NVIDIA/DeepLearningExamples and/or ngc.nvidia.com

    Args:
        pretrained (bool): If True, returns a model pretrained on LJ Speech dataset.
        model_math (str, 'fp32'): returns a model in given precision ('fp32' or 'fp16')
    """

    from PyTorch.SpeechSynthesis.Tacotron2.waveglow import model as waveglow
    from PyTorch.SpeechSynthesis.Tacotron2.models import batchnorm_to_float
    ...

def nvidia_tacotron2(pretrained=True, **kwargs):
    """Constructs a Tacotron 2 model (nn.module with additional infer(input) method).
    For detailed information on model input and output, training recipies, inference and performance
    visit: github.com/NVIDIA/DeepLearningExamples and/or ngc.nvidia.com

    Args (type[, default value]):
        pretrained (bool, True): If True, returns a model pretrained on LJ Speech dataset.
        model_math (str, 'fp32'): returns a model in given precision ('fp32' or 'fp16')
        n_symbols (int, 148): Number of symbols used in a sequence passed to the prenet, see
                              https://github.com/NVIDIA/DeepLearningExamples/blob/master/PyTorch/SpeechSynthesis/Tacotron2/tacotron2/text/symbols.py
        p_attention_dropout (float, 0.1): dropout probability on attention LSTM (1st LSTM layer in decoder)
        p_decoder_dropout (float, 0.1): dropout probability on decoder LSTM (2nd LSTM layer in decoder)
        max_decoder_steps (int, 1000): maximum number of generated mel spectrograms during inference
    """
    from PyTorch.SpeechSynthesis.Tacotron2.tacotron2 import model as tacotron2
    from PyTorch.SpeechSynthesis.Tacotron2.models import lstmcell_to_float, batchnorm_to_float
    from PyTorch.SpeechSynthesis.Tacotron2.tacotron2.text import text_to_sequence
    ...
내용의 일부를 생략했지만 안에서 nvidia_waveglow, nvidia_tacotron2 모델 동작에 필요한 모든 것들을 import 해주고 있다는 사실을 확인 할 수 있습니다. 이렇게 import가 가능한 이유는 torch.hub.load()가 호출되는 시점에 위에서 명시한 레포지토리를 아래 경로로 다운로드 받기 때문입니다. 해당 레포지토리에는 import에 필요한 모든 파일이 등록되어 있습니다.
~/.cache/torch/hub/<repo_owner>_<repo_name>_<repo_tag>그리고 hubconf.py 안에는 미리 학습된 모델(checkpoint)을 다운로드 하는 코드가 포함되어 있습니다.
# contents of hubconf.py
if fp16:
    checkpoint = 'https://developer.nvidia.com/joc-ncf-fp16-pyt-20190225'
else:
    checkpoint = 'https://developer.nvidia.com/joc-ncf-fp32-pyt-20190225'
ckpt_file = os.path.basename(checkpoint)
if not os.path.exists(ckpt_file) or force_reload:
    sys.stderr.write('Downloading checkpoint from {}\n'.format(checkpoint))
    urllib.request.urlretrieve(checkpoint, ckpt_file)
ckpt = torch.load(ckpt_file)
....
그래서 위에 작성한 코드를 돌려보면 다음과 같이 로컬 캐시 경로에 레포지토리 전체와 미리 학습된 모델(checkpoint)이 다운로드되는 것을 확인 할 수 있습니다.
$ python waveglow.py
Downloading: "https://github.com/nvidia/DeepLearningExamples/archive/master.zip" to /root/.cache/torch/hub/master.zip
Downloading checkpoint from https://developer.nvidia.com/joc-waveglow-fp32-pyt-20190306
한번 더 실행하면 어떨까요?
$ python waveglow.py
Using cache found in /root/.cache/torch/hub/nvidia_DeepLearningExamples_master
다운로드를 다시 받지 않고 캐시되어 있는 것을 그대로 가져다 사용하는 것을 확인 할 수 있습니다.
정리하면 결국 PyTorch Hub라는 것은 GitHub 레포지토리에 있는 코드의 내용을 쉽게 가져다 사용 할 수 있도록 wrapping 해주는 것으로 볼 수 있는데요. 그럼 우리도 충분히 등록해서 사용 할 수 있지 않을까요? 중요한건 hubconf.py를 잘 생성해주는 겁니다.
우리의 GitHub을 torch.hub.load()로 사용해보기
우리 GitHub에 새로운 레포지토리를 생성하고 hubconf.py를 다음과 같이 생성해줍니다.
# contents of hubconf.py
def hello_world(**kwargs):
    return "hello_world"
여기 레포지토리에는 hubconf.py를 제외하고 다른 파일은 없습니다. 기본적인 테스트니까요.
https://github.com/jybaek/helloworld
이제 torch.hub.load()를 통해서 가져와봅니다. 우리가 위에서 살펴본것처럼 정말 심플해요. repo_owner위치에 jybaek를 넣어줬고, 가져올 모듈로 hello_world를 지정했습니다.
import torch
foo = torch.hub.load('jybaek/helloworld', 'hello_world')

print(foo)
이제 실행하면 소스코드를 가져와서 캐시해두고 hello_world 모듈이 실행될겁니다. 다음과 같이 말이죠.
$ python3 test.py
Downloading: "https://github.com/jybaek/helloworld/archive/master.zip" to /root/.cache/torch/hub/master.zip
hello_world
예상한것처럼 다운로드 되고 모듈이 실행됐습니다.
나아가 PyTorch Hub에 직접 기여하고 싶다면 아래 페이지에 형식에 맞춰서 PR 날려주시면 되겠습니다.
https://github.com/pytorch/hub
마무리
PyTorch Hub의 대부분의 내용을 살펴본 이후에는 허무함을 감출 수 없었는데요. 살펴보면서 hub 코드 안을 들여다보니 혁신적이거나 새로울 것도 없었습니다. 하지만 많은 사용자들이 torch hub에 열광하는 것은 결국 간소함이 아닐까 싶습니다. 머신러닝이 블랙박스와 같이 포장되어 비전인식이나 TTS, STT처럼 API를 통해 제공되는 것들도 결국에는 "쓰기 편하니까" 혹은 "쓸만하니까" 같은 이유일텐데 hub도 마찬가지 같습니다.
공개되어 있는 GitHub을 받아서 직접 학습시키고 prediction해도 되지만 빠르게 무언가를 적용해본다던지 이미 학습된 모델로 여러가지 테스트를 해봐야 하는 상황이라면 PyTorch Hub는 좋은 선택일겁니다. Bert 같은 모델을 한번 돌려보면서 원리를 공부한다던지 테스트를 해보겠다고 긴 시간 학습시키고 있을 필요는 없으니까요. 이 글이 PyTorch Hub를 궁금해 하시는 누군가에게 도움이 되었기를 바랍니다.
'개발 > 기계학습' 카테고리의 다른 글
| [번역] TensorFlow @ Google I/O ’19 Recap (0) | 2019.08.25 |
|---|---|
| Load tacotron2+waveglow from PyTorch Hub (3) | 2019.06.17 |
| DataLoader num_workers에 대한 고찰 (8) | 2019.05.28 |
| compare-GPUs for machine learning (0) | 2019.05.14 |
| Towards end-to-end speech recognition (3) | 2019.05.10 |
- Total
- Today
- Yesterday